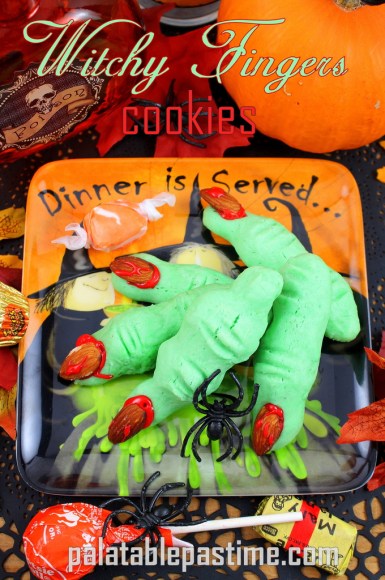
Wicked bony fingers make a sweet Halloween treat.

Witchy Fingers Cookies
by Sue Lau | Palatable Pastime
Hello October! It is finally well into the fall season and the leaves are changing color and falling everywhere. Jack o’Lanterns guard doorsteps against ghosts on the prowl and a cool autumn wind brings a chill to the air. Soon it will be Halloween!
This month, for Blogger C.L.U.E., the theme is autumn and my assigned blogger is Kim at Liv Life Blog. Kim lives in California and writes a healthy recipes blog for her family. She has an amazing collection of over 500 recipes to choose from, ranging from Blueberry Chia Jam to Roasted Chicken with Smoked Paprika to Bony Witch’s Fingers and much much more. I settled on the Witch’s fingers of course, not just because it is autumn and bearing down on Halloween, but because it is an amazingly clever idea.
I followed Kim’s recipe very closely, although I chose to add a different flavor and color the nails a bit different. You can see her original recipe here. We just loved these cookies and think they are great fun. Thanks Kim! 🙂

Witchy Fingers Cookies

Yield: 3 dozen cookies
Ingredients:
- 1 cup butter, softened
- 1 cup confectioners’ sugar
- 1 egg
- 25 drops green food coloring
- 1 teaspoon vanilla paste or vanilla extract
- 1 tablespoon orange extract
- 2 2/3 cups all-purpose flour
- 1 teaspoon baking powder
- 1 teaspoon salt
- 36+ whole raw almonds
- 1/2 cup confectioners sugar
- red food coloring
- few drops water or milk
- toothpicks (as needed)
Method:
- Place softened butter, confectioners sugar (1 cup), egg, green food coloring, and extracts in the bowl of an electric mixer and beat on low until smooth.
- Slowly add flour, baking powder, and salt, mixing into a stiff dough.
- Refrigerate dough for 30 minutes.
- Preheat oven to 325ºF.
- Line cookie sheets with parchment paper.
- Take one tablespoonful of dough and roll into a cigar shape, spreading your fingers as it thins to give a lumpy, knobbed appearance (for knuckles).
- Place cookie onto parchment, and using a wet toothpick, press the toothpick into the thicker part and twist, to make finger wrinkles.
- Press a whole almond into the end.
- Bake cookies for 20 minutes or until firm; allow to cool about ten minutes.
- Flip off the almonds (they don’t really stick).
- Mix the remaining 1/2 cup confectioners sugar with a few drops of red food color and enough milk to make a pasty icing.
- Using a couple toothpicks, dabs some icing into the hollow where the almond was and press the almond back on. Scratch a little extra red icing on top of nut for a bloody look.
- Allow frosting to set, then store cookies in an airtight container.
From the kitchen of palatablepastime.com

Blogger C.L.U.E. Society
-
- Apple Coffee Cake by Jean from Lemons and Anchovies
- Applesauce Cranberry Bundt Cake by Aly from Cooking in Stilettos
- Baked Squash Stuffed with Homemade Applesauce by Kathy from A Spoonful of Thyme
- Banana Peanut Butter Chip Muffins by Christy from Confessions of a Culinary Diva
- Braised Chicken Leg Quarters by Wendy from A Day in the Life on the Farm
- Brussels Sprouts with Harissa, Honey and Lime by Stacy from Food Lust People Love
- Creamy Butternut Squash Soup by Azmina from Lawyer Loves Lunch
- Frangelico Squares by Kate from Kate’s Kitchen
- German Apple Pancake by Liz from That Skinny Chick Can Bake
- Honey Sriracha Sweet Potatoes by Lauren from Sew You Think You Can Cook
- Hot Curried Chicken Salad by Debra from Eliot’s Eats
- Pumpkin Bran Muffins by Anna from annaDishes
- Pumpkin Palmiers by Lisa from Authentic Suburban Gourmet
- Raspberry Cointreau Syllabub by Kate from Kate’s Kitchen
- Witchy Finger Cookies by Sue from A Palatable Pastime
You might also like:
Oh, Sue, these are fabulous!!! I loved having your blog this month. Your apple pancake was amazing!!
Thanks!
Fantastic! My daughter would be so, so very happy if I made these for her. They’re awesome.
Thanks!
Oh my gosh…..these are just fantastic. I cannot wait until my Little Miss is old enough to help me make these!!!
Thanks
What a perfect Halloween treat! Creepy fingers….I mean that in the best way! 🙂
Thanks
What a perfect Autumn selection for this month’s theme. Looks so tasty. Such a cleaver choice and perfect to celebrate Halloween!
Thanks
I love these! Thanks for going all Halloween on us. 🙂
Thanks
Sue, are wild! I love them.
Thanks!
Hi Sue! Thanks for sharing these. I was looking for a recipe for our neighborhood Halloween potluck and these look perfect. Spooky and delicious!
Enjoy! 🙂
So sorry for the late comment Sue, life got in the way the last few weeks.
But you’ve got one of our favorite recipes here! Super fun for the holiday, but also the flavors simply have me reaching for thirds and fourths!! 🙂
Thanks!